HAProxy之二----HAProxy实现高级负载均衡实战和ACL控制
haproxy实现高级负载均衡实战
环境:随着公司业务的发展,公司负载均衡服务已经实现四层负载均衡,但业务的复杂程度提升,公司要求把mobile手机站点作为单独的服务提供,不在和pc站点一起提供服务,此时需要做7层规则负载均衡,运维总监要求,能否用一种服务既能实现七层负载均衡,又能实现四层负载均衡,并且性能高效,配置管理容易,而且还是开源。
实验前准备:
① 两台服务器都使用yum 方式安装haproxy
yum -y install haproxy
② iptables -F && setenforing 清空防火墙策略,关闭selinux
实战一:实现haproxy的Https协议
配置HAProxy支持https协议:
支持ssl会话;
bind *:443 ssl crt /PATH/TO/SOME_PEM_FILE
crt 后证书文件为PEM格式,且同时包含证书和所有私钥
cat demo.crt demo.key > demo.pem
把80端口的请求重向定443
bind *:80
redirect   scheme   https   if   !{ ssl_fc }
向后端传递用户请求的协议和端口(frontend或backend)
http_request set-header X-Forwarded-Port %[dst_port]
http_request add-header X-Forwared-Proto https if { ssl_fc }
1、https-证书制作
[root@lvs ~]# cd /etc/pki/tls/certs/  # 切换到此目录下创建证书
[root@lvs certs]# ls
ca-bundle.crt  ca-bundle.trust.crt  localhost.crt  magedu.key  make-dummy-cert  Makefile  renew-dummy-cert
[root@lvs certs]# make /etc/haproxy/haproxy.pem   # 创建证书,并将证书指定到/etc/haproxy目录下
umask 77 ; \
PEM1=`/bin/mktemp /tmp/openssl.XXXXXX` ; \
PEM2=`/bin/mktemp /tmp/openssl.XXXXXX` ; \
/usr/bin/openssl req -utf8 -newkey rsa:2048 -keyout $PEM1 -nodes -x509 -days 365 -out $PEM2  ; \
cat $PEM1 >  /etc/haproxy/haproxy.pem ; \
echo ""    >> /etc/haproxy/haproxy.pem ; \
cat $PEM2 >> /etc/haproxy/haproxy.pem ; \
rm -f $PEM1 $PEM2
  nerating a 2048 bit RSA private key
...................+++
...........................+++
writing new private key to '/tmp/openssl.XHjhcI'
-----
You are about to be asked to enter information that will be incorporated
into your certificate request.
What you are about to enter is what is called a Distinguished Name or a DN.
There are quite a few fields but you can leave some blank
For some fields there will be a default value,
If you enter '.', the field will be left blank.
-----
Country Name (2 letter code) [XX]:CN
State or Province Name (full name) []:shanghai
Locality Name (eg, city) [Default City]:shanghai
Organization Name (eg, company) [Default Company Ltd]:dev
Organizational Unit Name (eg, section) []:opt
Common Name (eg, your name or your server's hostname) []:www.peng.com
Email Address []:
2、在HAProxy主机配置http跳转至https网站
listen web_server
        bind :80
        bind :443  ssl crt /etc/haproxy/haproxy.pem
        mode http    # 当访问是http网址时
        redirect scheme https if !{ ssl_fc }  # 直接跳转至https网址上
        server web1 192.168.37.27:80 check inter 3000 fall 3 rise 5  # 对后端的192.168.37.27服务器进行加密
网页访问效果:

实战二:基于ACL控制实现动静分离
原理:acl:访问控制列表,用于实现基于请求报文的首部、响应报文的内容或其它的环境状态信息来做出转发决策,这大大增强了其配置弹性。其配置法则通常分为两步,首先去定义ACL ,即定义一个测试条件,而后在条件得到满足时执行某特定的动作,如阻止请求或转发至某特定的后端
1、环境准备:
| 机器名称 |
IP配置 |
服务角色 |
备注 |
| haproxy-server |
192.168.37.17 |
负载均衡器 |
ACL控制 |
| RS1 |
192.168.37.37 |
静态服务器 |
http后端图片 |
| RS2 |
192.168.37.47 |
动态服务器 |
php程序和nginx服务 |
2、在RS2安装nginx和php-fpm包,并配置nginx服务
1、安装nginx和php-fpm包
[root@centos37error_page]#yum install php-fpm nginx -y
2、配置nginx服务
        location ~ \.php$ {
            root           html;
            fastcgi_pass   127.0.0.1:9000;
            fastcgi_index  index.php;
            fastcgi_param  SCRIPT_FILENAME   $document_root$fastcgi_script_name;
            include        fastcgi_params;
        }
3、在nginx默认的访问页面下新建一个index.php文件,作为访问php的页面
[root@centos37html]#vim /usr/share/nginx/html/index.php
<?php
    phpinfo();
?>
3、在RS1服务器上安装httpd服务,并做相关配置
[root@cenots47html]#yum install httpd -y  安装httpd服务
[root@cenots47html]#cd /var/www/html   在此目录下存放一张图片
4、配置haproxy调度服务器
listen stats   监听状态页
        bind :9527
        stats enable
        stats hide-version
        stats uri /haproxy-status
        stats realm HAPorxy\Stats\Page
        stats auth haadmin:123456
        stats auth admin:123456
        stats refresh 30s
        stats admin if TRUE

frontend web      frontend 自定义ACL
        bind 192.168.37.17:80
        mode http
        acl php_server path_end -i  .php
        use_backend  php_server_host if php_server
        acl  image_server  path_end  -i  .jpg .png  .jpeg .gif
        use_backend  image_server_host if image_server

backend php_server_host   后端集群服务
        balance roundrobin
        server web1 192.168.37.37:80 weight 1 check  port 80 inter 3s fall 3 rise 5

backend image_server_host  后端集群服务
        balance roundrobin
        server web2 192.168.37.47:80 weight 1 check  port 80 inter 3s fall 3 rise 5
5、最后启动web端服务
[root@cenots47~]#systemctl start httpd
[root@cenots37~]#systemctl start haproxy  nginx  php-fpm
6、在网页上验证效果
当访问php后缀的文件页面时,haproxy就会调度到php程序的服务上去。

当访问jgp后缀格式的网页时,haproxy就会调度到图片服务器上

ACL也可以定义匹配文件路径
在HAProxy机器上配置
listen stats   监听状态页
        bind :9527
        stats enable
        stats hide-version
        stats uri /haproxy-status
        stats realm HAPorxy\Stats\Page
        stats auth haadmin:123456
        stats auth admin:123456
        stats refresh 30s
        stats admin if TRUE

frontend web      frontend 自定义ACL
        bind 192.168.37.17:80
        mode http
        acl php_server path_end -i  .php
        use_backend  php_server_host if php_server
        acl image_path path_beg -i /static /images /javascript  /tfs  也可以将静态页面进行定义匹配文件路径
        use_backend  image_server_host if image_server

backend php_server_host   后端集群服务
        balance roundrobin
        server web1 192.168.37.37:80 weight 1 check  port 80 inter 3s fall 3 rise 5

backend image_server_host  后端集群服务
        balance roundrobin
        server web2 192.168.37.47:80 weight 1 check  port 80 inter 3s fall 3 rise 5
此时将http服务的图片放至新建的tfs目录下,也可以访问到图片内容。

实战三:实现HAProxy调度mysql数据库
1、在HAProxy调度器上修改配置文件
vim /etc/haproxy/haproxy.cfg
listen WEB_PORT_80 将http或nginx调度到192.168.37.27服务器上
        bind 192.168.37.17:80
        mode tcp
        server web1 192.168.37.27:443 check inter 3000 fall 3 rise 5


listen mysql_port  将mysql调度到192.168.37.37
        bind 12.168.37.17:3306
        mode tcp
        server web1 192.168.37.37:3306 check insert 3000 fall 3 rise 5
2、在后端服务器RS3安装mariadb-server数据库
[root@centos37html]#yum install mariadb-server -y
[root@centos37html]#systemctl start mariadb
[root@centos37html]#mysql -e "grant all on *.* to test@'192.168.37.%' identified by 'centos'"   创建一个数据库账号
3、在客户端开始用创建的数据库账号进行访问
在客户端修改/etc/hosts配置文件,解析HAProxy域名

在客户端进行域名访问HAProxy域名,此时HAProxy会进行调度到后端的mysql数据库。
[root@centos7~]#yum install mysql -y  在客户端安装一个mysql客户端软件
[root@centos7~]#mysql -utest -pcentos -hwww.magedu.net   此时在客户端通过域名解析就可以登录后端
Welcome to the MariaDB monitor.  Commands end with ; or \g.
Your MariaDB connection id is 4
Server version: 5.5.60-MariaDB MariaDB Server

Copyright (c) 2000, 2018, Oracle, MariaDB Corporation Ab and others.

Type 'help;' or '\h' for help. Type '\c' to clear the current input statement.

MariaDB [(none)]>
实战四:四层访问控制
1、在HAProxy配置四层拒绝访问的配置
listen mysql_port
        bind 192.168.37.17:3306
        mode tcp
        acl invalid_src src 192.168.1.0/24 192.168.37.7  拒绝37.7以及1.0网段的地址访问数据库
        tcp-request  connection reject if invalid_src     如果使用的是invalid_src,就会被拒绝,而invalid_src使用的是192.168.37.7地址。
        server web1  192.168.37.37:3306  check inter 3000 fall 3 rise 5
2、在37.7的客户端访问数据库
[root@centos7~]#mysql -utest -pcentos -hwww.magedu.net   由于拒绝了此IP地址的访问,就无法登陆数据库
ERROR 2013 (HY000): Lost connection to MySQL server at 'reading initial communication packet', system error: 104
实战五:实现将配置文件分离存放
当我们再haproxy主配置文件中存放文件时,会出现配置文件过多,导致haproxy主配置文件比较大,书写不方便,我们可以将重要的配置文件存放在一个固定的目录下,并分离存放,指明每个配置文件的信息,方便管理。
1、在haproxy主配置文件下新建一个目录,并将主要的配置文件存放在新建目录下
[root@centos_17conf]#mkdir /etc/haproxy/conf
将mysql的配置文件存放在conf目录下
[root@centos_17conf]#cat mysql.cfg  存放的文件必须是cfg后缀文件
listen mysql_port
       bind 192.168.37.17:3306
       mode tcp
       acl invalid_src src 192.168.1.0/24 192.168.37.7
       tcp-request  connection reject if invalid_src
       server web1  192.168.37.37:3306  check inter 3000 fall 3 rise 5
将web配置文件也存放在conf目录下
[root@centos_17conf]#cat web.cfg  存放的文件后缀,必须是cfg后缀
listen WEB_PORT_80
        bind 192.168.37.17:80
        mode http
        redirect scheme https if !{ ssl_fc }
        server web1 192.168.37.27:80 check inter 3000 fall 3 rise 5

listen WEB_PORT_443
        bind 192.168.37.17:443  ssl crt /usr/local/haproxy/certs/haproxy.pem
        mode tcp
        server web1  192.168.37.27:80  check inter 3000 fall 3 rise 5
        server web2  192.168.37.37:80  check inter 3000 fall 3 rise 5
2、在haproxy配置文件中添加上关联存放的配置文件路径
vim /usr/lib/systemd/system/haproxy.service
[Unit]
Description=HAProxy Load Balancer
After=syslog.target network.target

[Service]
ExecStartPre=/usr/sbin/haproxy -f /etc/haproxy/haproxy.cfg -f /etc/haproxy/conf  -c -q   添加一个-f /etc/haproxy/conf,与haproxy主配置文件关联起来。
ExecStart=/usr/sbin/haproxy -Ws -f /etc/haproxy/haproxy.cfg  -f /etc/haproxy/conf  -p /run/haproxy.pid
ExecReload=/bin/kill -USR2 $MAINPID

[Install]
WantedBy=multi-user.target
添加完关联目录路径后,进行重新加载,并重新启动haproxy服务
[root@centos_17conf]#systemctl daemon-reload
[root@centos_17conf]#systemctl restart haproxy
3、查看存放在指定目录的文件效果:

实战六:实现HAProxy-服务器动态上下线
 yum install socat
 echo "show info" | socat stdio /var/lib/haproxy/haproxy.sock
 echo "get  weight web_host/192.168.7.101" | socat stdio /var/lib/haproxy/haproxy.sock
 echo "disable  server web_host/192.168.7.101" | socat stdio /var/lib/haproxy/haproxy.sock
 echo "enable  server web_host/192.168.7.101" | socat stdio /var/lib/haproxy/haproxy.sock
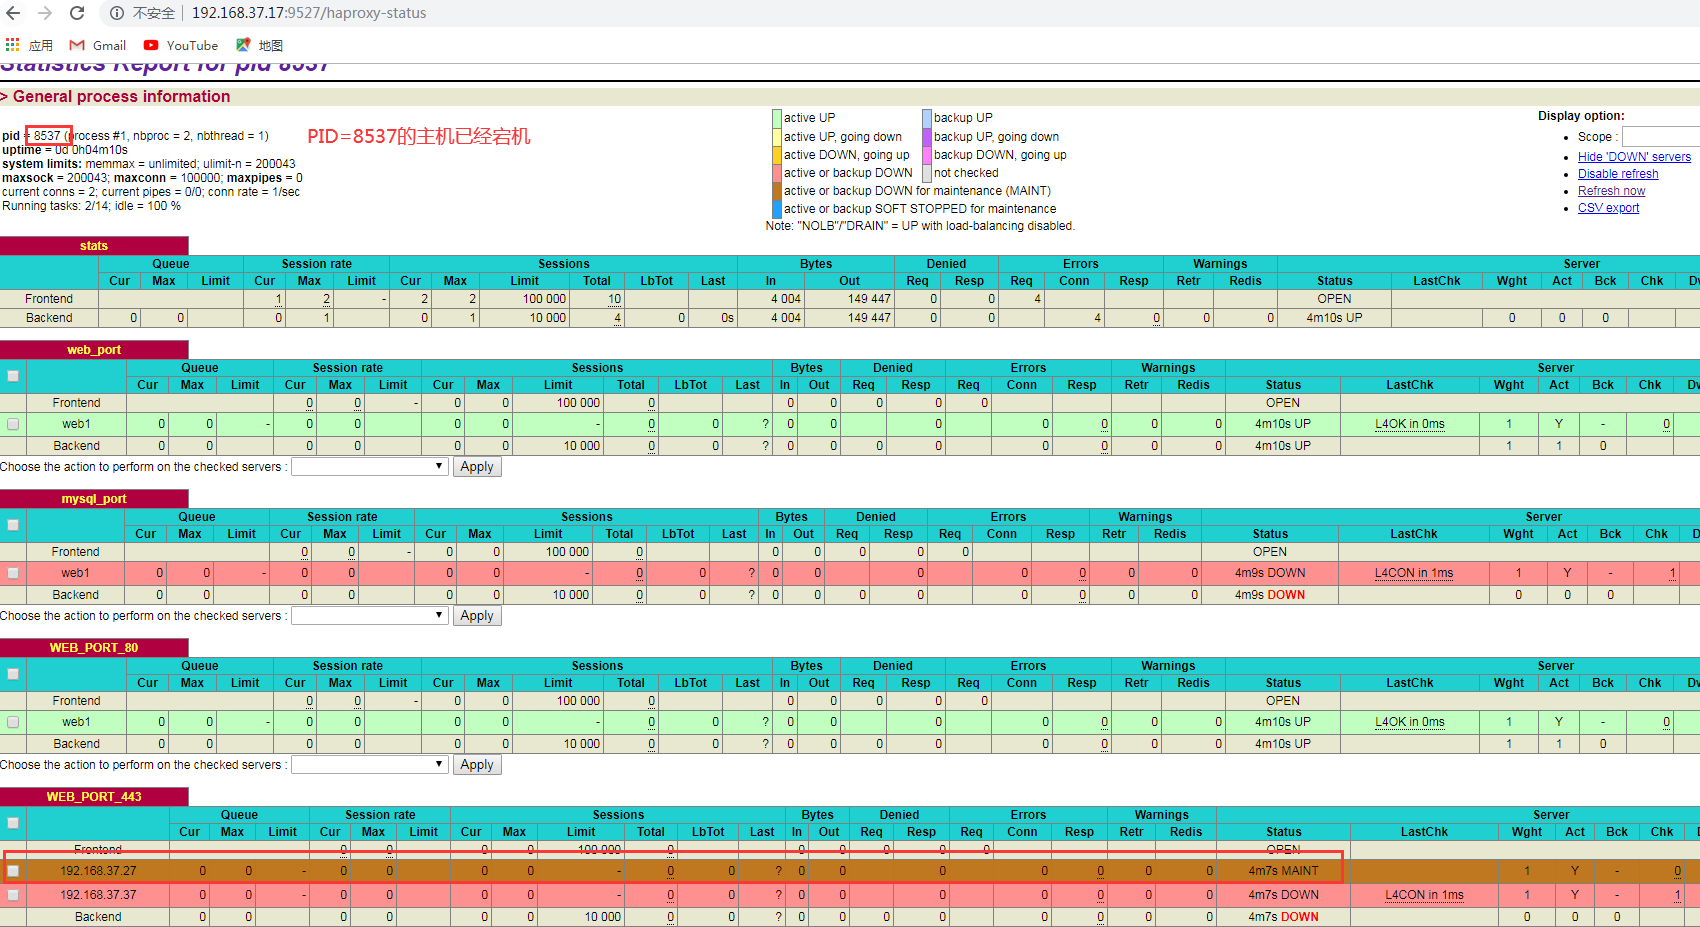
当我们配置haproxy主机多线程时,我们将一个主机下线,此时如果主机是双线程时,就会有一个主机的另一个线程还会在后端提供服务,这种情况,我们该怎么解决呢?如下图:
模拟宕机掉192.168.37.27主机:
[root@centos_17haproxy]# echo "disable server WEB_PORT_443/192.168.37.27" | socat stdio /var/lib/haproxy/haproxy.sock
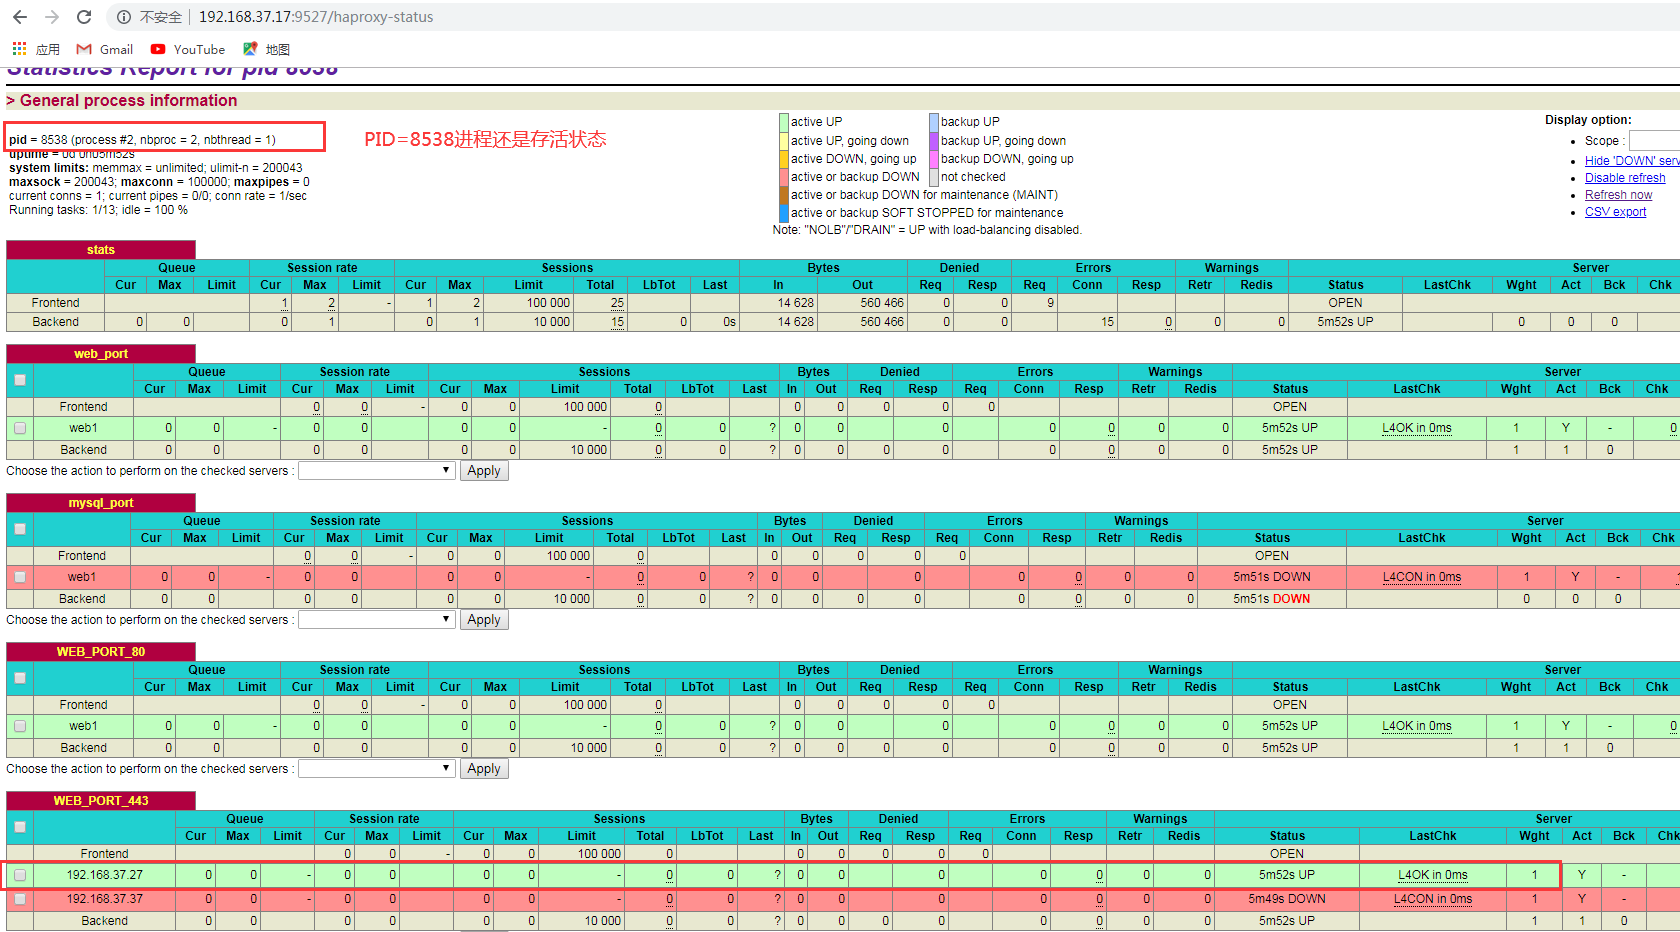
此时可以看到PID=8537的进程宕机了,而PID=8538的主机还是存活状态,此时就还会为后端服务器进行代理转发。
解决办法:
主要的原因是跟socket配置文件有关,只需要在haproxy主配置文件中添加socket配置文件信息。
1、此时先查看haproxy服务器的配置文件
vim /etc/haproxy/haproxy.cfg
global
maxconn 100000
chroot /usr/local/haproxy
stats socket /var/lib/haproxy/haproxy.sock1 mode 600 level admin  process 1  如果有两个进程,就配置两个sock配置文件,而且两个文件名称要不一样,有N个线程,就写入N个sock文件。
stats socket /var/lib/haproxy/haproxy.sock2 mode 600 level admin  process 2
user haproxy
group haproxy
daemon
nbproc 2   可以看到CPU有两个,此时开启的是双线程。
cpu-map 1 0
cpu-map 2 1
#cpu-map 3 2
#cpu-map 4 3
pidfile /run/haproxy.pid
log 127.0.0.1 local3 info

defaults
option http-keep-alive
option forwardfor
maxconn 100000
mode http
timeout connect 300000ms
timeout client 300000ms
timeout server 300000ms


listen stats
bind :9527
stats enable
stats hide-version
stats uri /haproxy-status
stats realm HAPorxy\Stats\Page
stats auth haadmin:123456
stats auth admin:123456
stats refresh 30s
stats admin if TRUE


listen WEB_PORT_80
        bind 192.168.37.17:80
        mode http
        redirect scheme https if !{ ssl_fc }
        server web1 192.168.37.27:80 check inter 3000 fall 3 rise 5

listen WEB_PORT_443
        bind 192.168.37.17:443  ssl crt /usr/local/haproxy/certs/haproxy.pem
        mode tcp
        server web1  192.168.37.27:80  check inter 3000 fall 3 rise 5
        server web2  192.168.37.37:80  check inter 3000 fall 3 rise 5
2、新建sock配置文件目录
由于sock配置文件无法自动生成,需要新建一个存放sock目录文件
[root@centos_17conf]#mkdir /var/lib/haproxy
[root@centos_17conf]#systemctl restart haproxy
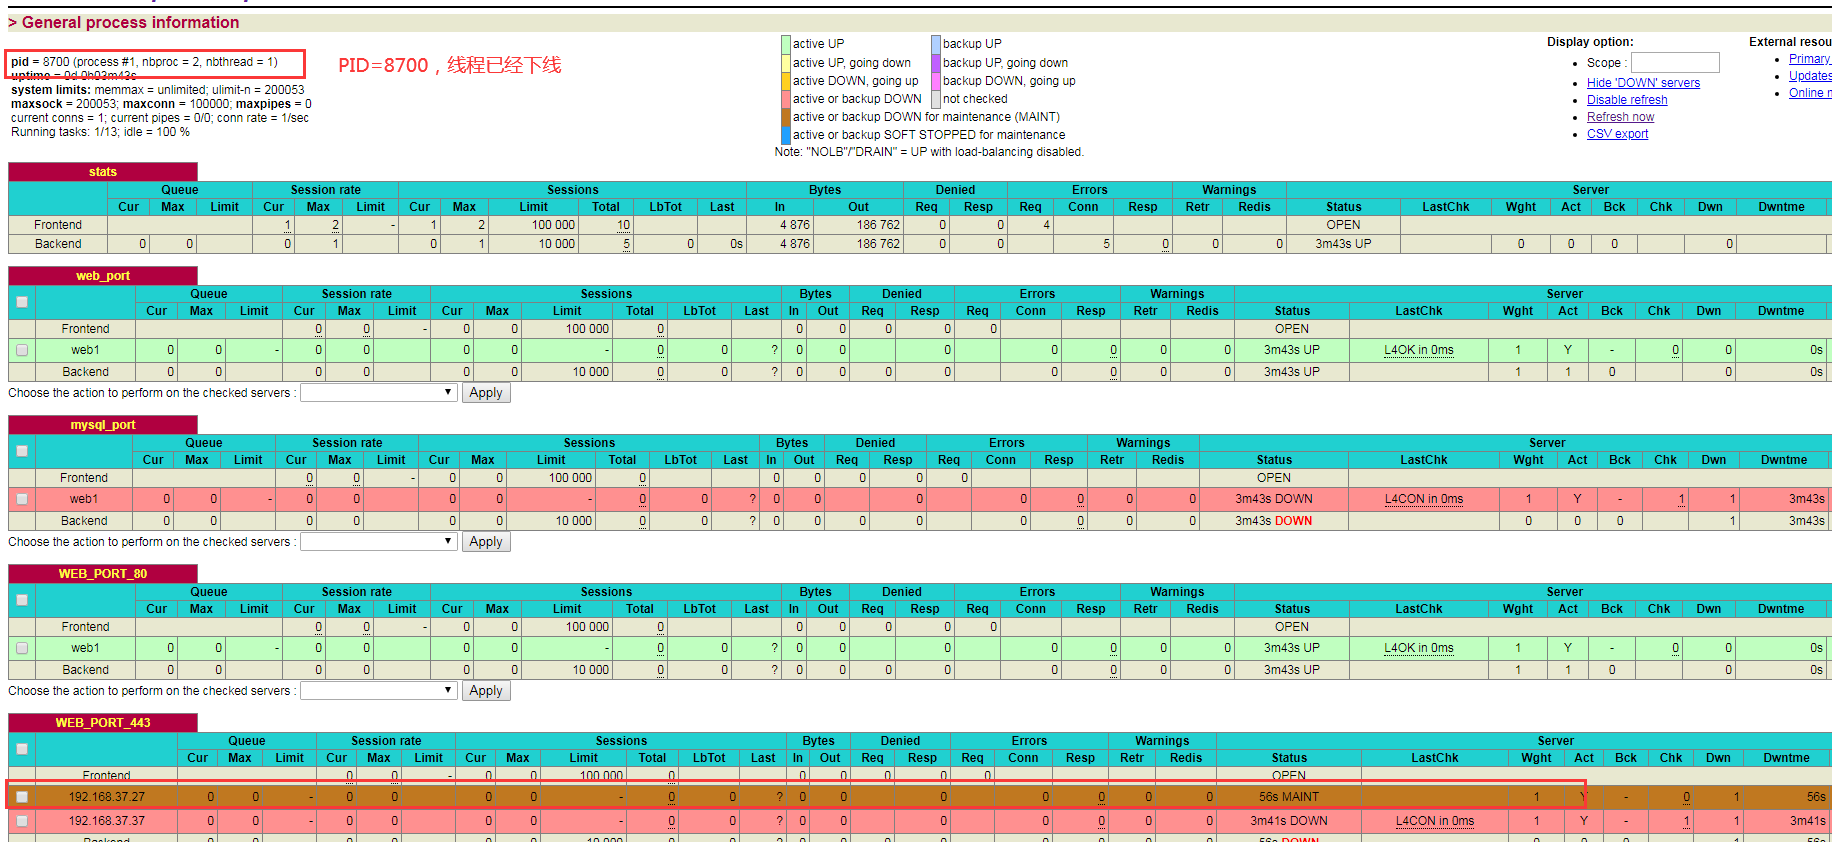
3、模拟下线后端服务器
下线后端服务器不同的sock后缀文件,此时就会将多线程的服务器进行下线。
[root@centos_17haproxy]# echo "disable  server WEB_PORT_443/192.168.37.27" | socat stdio /var/lib/haproxy/haproxy.sock1

[root@centos_17haproxy]# echo "disable  server WEB_PORT_443/192.168.37.27" | socat stdio /var/lib/haproxy/haproxy.sock2
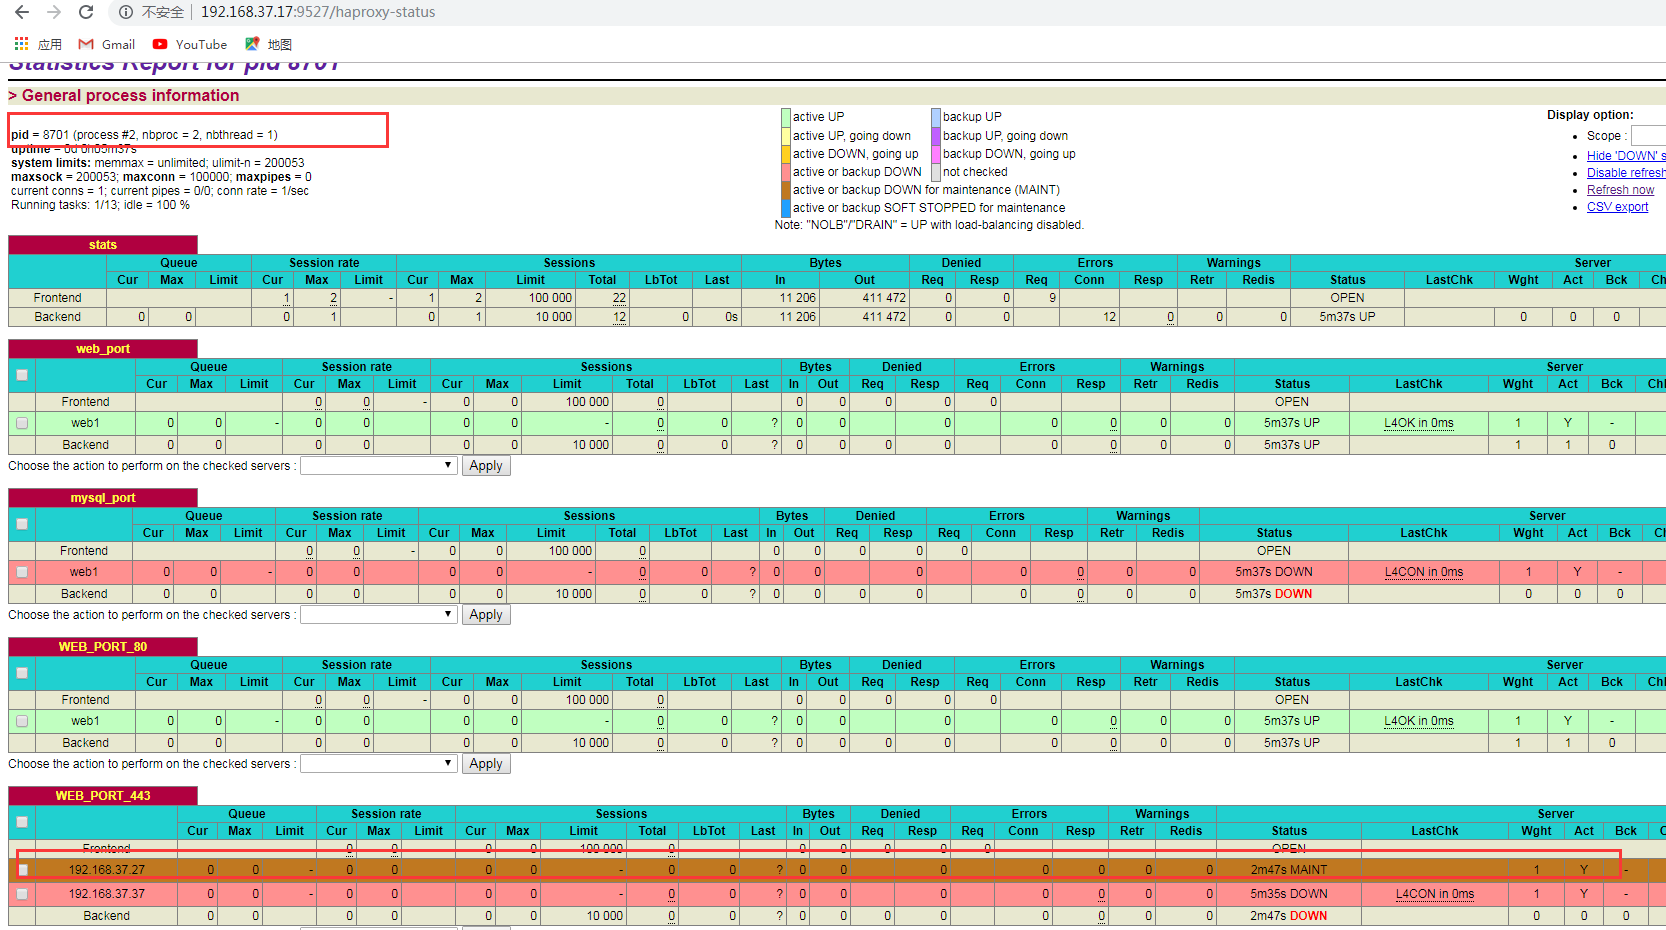
此时可以看到此服务器的两个线程PID=8700/8701都已经下线。
批量实现一个1-128的sock后缀文件,方便在配置文件中写入多个文件。
脚本如下:
[root@centos_17~]#vim sock.sh

#!/bin/bash

for i in  `seq 1 128`;do
     echo "stats socket /var/lib/haproxy/haproxy.sock$i mode 600 level admin  process $i"
done
执行脚本,生成的结果,直接可以复制到haproxy配置文件中即可。
[root@centos_17~]#bash sock.sh
stats socket /var/lib/haproxy/haproxy.sock1 mode 600 level admin  process 1
stats socket /var/lib/haproxy/haproxy.sock2 mode 600 level admin  process 2
stats socket /var/lib/haproxy/haproxy.sock3 mode 600 level admin  process 3
stats socket /var/lib/haproxy/haproxy.sock4 mode 600 level admin  process 4
stats socket /var/lib/haproxy/haproxy.sock5 mode 600 level admin  process 5
stats socket /var/lib/haproxy/haproxy.sock6 mode 600 level admin  process 6
stats socket /var/lib/haproxy/haproxy.sock7 mode 600 level admin  process 7
stats socket /var/lib/haproxy/haproxy.sock8 mode 600 level admin  process 8
stats socket /var/lib/haproxy/haproxy.sock9 mode 600 level admin  process 9
stats socket /var/lib/haproxy/haproxy.sock10 mode 600 level admin  process 10
stats socket /var/lib/haproxy/haproxy.sock11 mode 600 level admin  process 11
stats socket /var/lib/haproxy/haproxy.sock12 mode 600 level admin  process 12
stats socket /var/lib/haproxy/haproxy.sock13 mode 600 level admin  process 13
stats socket /var/lib/haproxy/haproxy.sock14 mode 600 level admin  process 14
stats socket /var/lib/haproxy/haproxy.sock15 mode 600 level admin  process 15
stats socket /var/lib/haproxy/haproxy.sock16 mode 600 level admin  process 16
stats socket /var/lib/haproxy/haproxy.sock17 mode 600 level admin  process 17
stats socket /var/lib/haproxy/haproxy.sock18 mode 600 level admin  process 18
stats socket /var/lib/haproxy/haproxy.sock19 mode 600 level admin  process 19
stats socket /var/lib/haproxy/haproxy.sock20 mode 600 level admin  process 20
stats socket /var/lib/haproxy/haproxy.sock21 mode 600 level admin  process 21
stats socket /var/lib/haproxy/haproxy.sock22 mode 600 level admin  process 22
目录 返回
首页